Get Started With Solana Blockchain NFT Minting using Metaplex
Crypto & NFTs have been all the rage in 2021 and the hype is far from over.


1. Intro
The days when the infinite money glitch of living off investments and dividends is boomer talk, crypto makes people millionaires left and right and other more broke than ever.
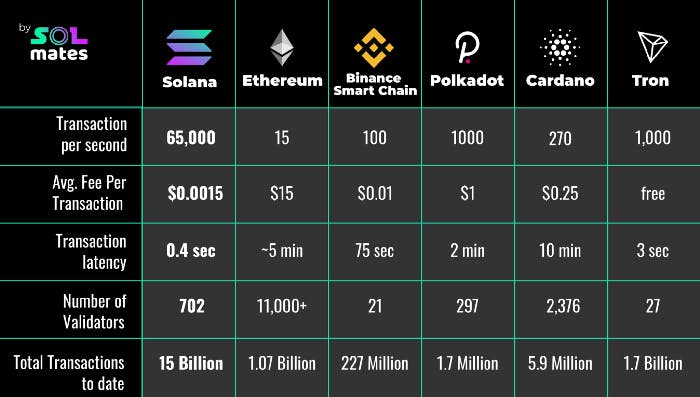
Out of all the popular ‘blue chip’ coins one stands out with immense development potential and a dedicated community, the purple coin Solana. Unlike Ethereum with it’s insanely high transaction fees it has minimal cost for usage and incredible speed (more than 50 000 transaction / second compared to Ethereum’s 15–45 / second).
Enough with the chit-chat and let’s get on setting up the development environment.
I recommend working on Linux or WSL if on Windows as I found it smoother for Solana CLI installation and Metaplex upload.
Install the client via terminal with the following command:
sh -c "$(curl -sSfL https://release.solana.com/v1.8.3/install)"
Restart the terminal and run solana — version to check the installation.
The tool suite we installed provides many useful utilities for setting the network config and creating testing wallets with airdropped SOL. All commands can be found in the Official Documentation.
2. NFTs & Metaplex Upload
Let’s talk NFTs in the simplest way, digital art validated through blockchain allowing for digital artist to sell their artwork and earn bucks. NFTs are tokens which link an asset (most often an image) hosted on the internet to a certain transaction in the blockchain making it unique and valuable but not entirely immune to copy paste.
What if you are a coder and yet you want to join the NFT space without much artistic skills? Well you could definitely try Generative Art and maybe some mix & match of SVG layers and tinker with HashLips’s great Art Engine.
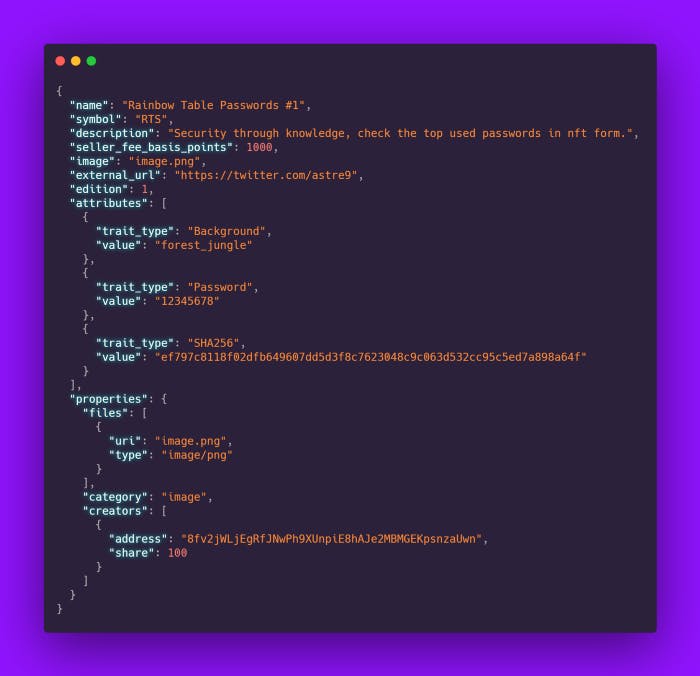
After all that is setup and you have generated the desired .png files and .json metadata for each NFT in the collection you could go through all the Metaplex Documentation and manually setup the keys and candy machine but there is actually a better, lesser known way using Kevin Faveri’s Solana Candy Factory.
I suggest you go through the README.md and have a basic understanding of React & NextJS before proceeding to cloning this repo as a template.
Metaplex is a suite of contracts to ease the process of launching an NFT collection on Solana, for this example we’ll use the Candy Machine which covers the NFT mint and asset upload parts.
Make sure you have installed node, yarn and ts-node:
sudo apt update && sudo apt upgrade
sudo apt -y install curl dirmngr apt-transport-https lsb-release ca-certificates && curl -sL https://deb.nodesource.com/setup_14.x | sudo -E bash -
sudo apt -y install nodejs
curl -sS https://dl.yarnpkg.com/debian/pubkey.gpg | sudo apt-key add - && echo "deb https://dl.yarnpkg.com/debian/ stable main" | sudo tee /etc/apt/sources.list.d/yarn.list
sudo apt update && sudo apt install yarn
npm install -g ts-node
After that we’ll clone the Metaplex repo, make sure to use the same path or update the .sh scripts in solana-candy-factory/devtools.
git clone git@github.com:metaplex-foundation/metaplex.git \
  ~/metaplex-foundation/metaplex
Now we can proceed to move all nft related files (.png and .json) to /nft-sources directory and run
yarn install
yarn setup-dev
The script will generate the keys and an account for deployment to the devnet network, you’ll have the option to airdrop the new account some SOL to get started and will inject all required environment variables to .env file in our DAPP.
3. NextJS DAPP
Before we run the template we should import the created wallet into Phantom or other Solana Wallet Provider you may like. Copy the content of ~/.config/solana/candyfactory-devnet.json into the private key field in import wallet.
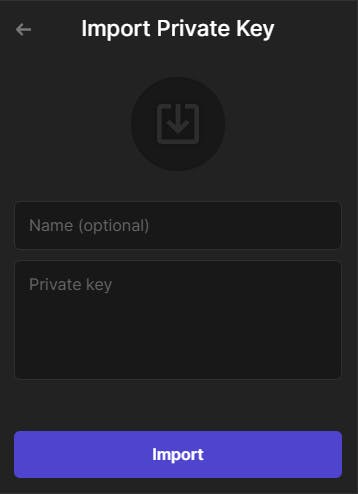
If you are working on mainnet with real money make sure to keep your private key and connection info secure and not reuse passwords across accounts
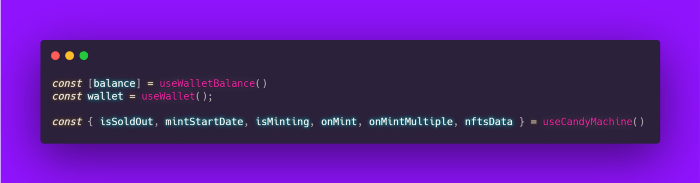
The connection logic is neatly structured within the hooks folder as custom React Hooks for ease of use. The mint button may not work without populating a Google Recaptcha API Key so it can be replaced with a simple button.
Using these hooks you can quickly integrate in any other NextJS project and start using Solana straight away. The choose wallet popup has beautiful look & feel out of the box as it comes with Material UI or Ant UI and can be further customized to suit your branding.
Code as simple as this really makes a developer break in tears of joy:
With this template you can really boost the development speed considerably so big thanks to Kevin Faveri & contributors for creating this 🚀.
Check more of my work at alexstreza.dev.
Hope you liked this short intro to Solana Development although it barely scratches the surface of all the things you can create in the NFT space but it’s a good start for a digital art journey and would love if you give this article a 🦄!